Migrating case data from earlier PRPC versions to Pega Platform
When you upgrade to the Pega® Platform, case data (which refers to the history data, assignments, workbaskets, notes, and SLAs of a case instance) is migrated automatically when the relevant database schema is upgraded. However, if you are not performing the complete upgrade, and instead want to migrate one or more applications to the latest version, you must migrate the case data manually.
This article explains the procedure to identify and migrate the database tables that store the required case data.
A typical migration consists of the following tasks:
- Identifying database tables that contain case data including assignments, workbaskets, notes, and SLAs.
Extracting and exporting the data from the source system.
Importing the data into the target system.
Postmigration tasks.
Prerequisites
Before you begin, make sure that you have completed the following tasks:
Import your application instances by using the RAP import utility.
Ensure that the imported application is working.
Ensure that class names, class structure, and class inheritance path have not changed in the imported application.
Migrate correspondence records.
Identifying the database tables that contain case data
Use the Work Package utility to identify the database tables that contain case data.
Click > > > .
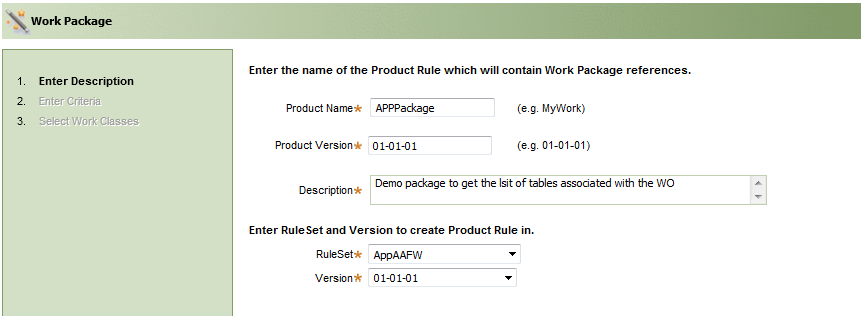
Enter the product name and version, and select the ruleset version. Click Next.
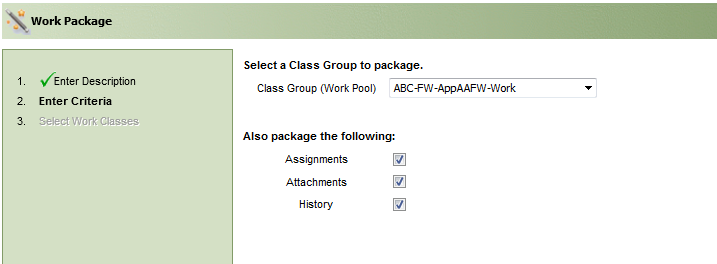
Select the work Class Group used in the application. If you want to include the related assignments, attachments, and history, select the corresponding check boxes.
Click Next.
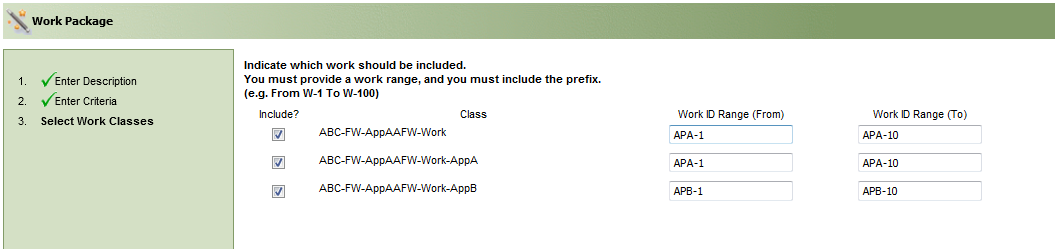
Select the required work classes, and provide the Work ID Range.
Click Finish.
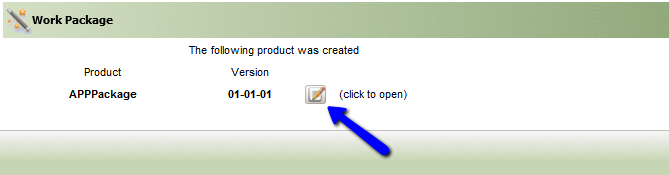
Click Edit.
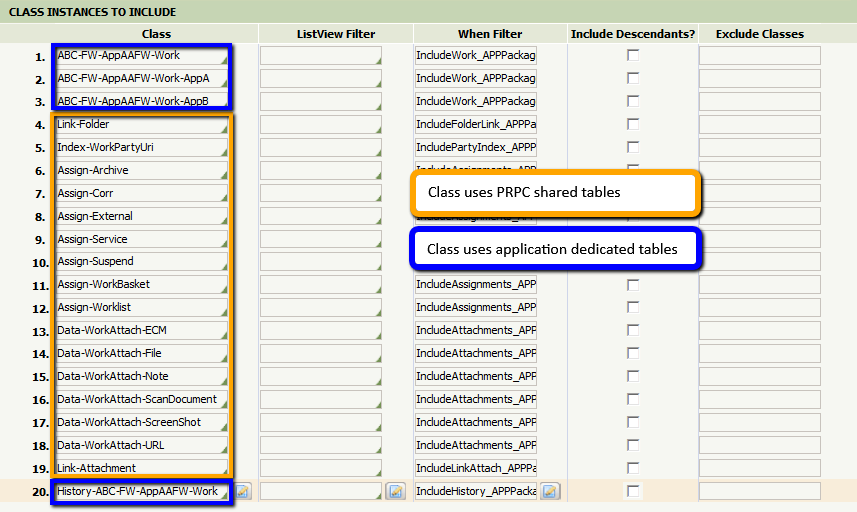
Click the icon next to a class to open the instance.

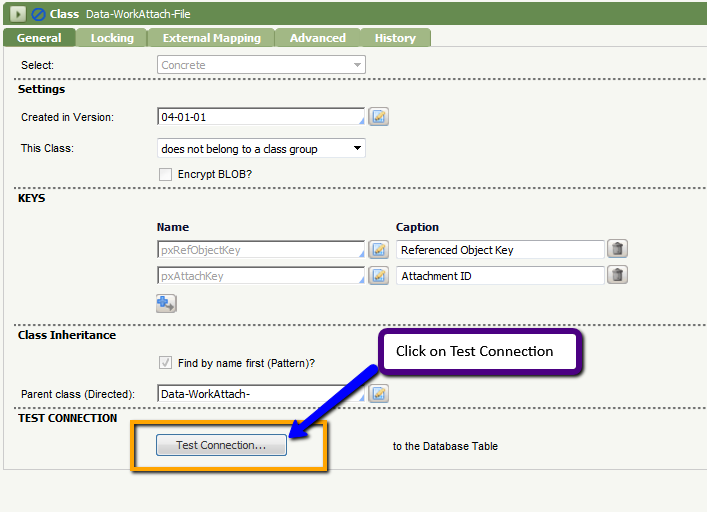
Click Test Connection to map the table to this class.
Repeat Steps 8 and 9 for all of the class instances.
You have identified the list of database tables that contain the required case data. The next step is to extract the data within these tables.
Extracting and exporting data from a source system
The data that needs to be extracted differs depending on whether you are migrating a single application or multiple applications.
Exporting case data for a single application
Use the following query to extract data from a database table:
SELECT * FROM <SCHEMA_NAME>.<TABLE_NAME>;Extract the following tables from the source PegaRULES database:
| Serial number | Table name | Table type |
|---|---|---|
| 1 | pr_assign | Shared |
| 2 | pc_index_workparty | Shared |
| 3 | pc_assign_workbasket | Shared |
| 4 | pc_assign_worklist | Shared |
| 5 | pc_link_attachment | Shared |
| 6 | pc_data_workattach | Shared |
| 7 | pc_data_uniqueid | Shared |
| 8 | pc_link_folder | Shared |
| 9 | PR_SYS_QUEUE_SLA | Shared |
| 10 | PR_SYS_QUEUES | Shared |
| 11 | pc_work_*(Work table - Application-specific) | Dedicated |
| 12 | pc_history_*(Work table history - Application-specific) | Dedicated/Shared |
Exporting case data for multiple applications
Multiple applications contain several class groups that can be mapped to different shared or dedicated tables.
Extract the case data spread over multiple tables by using selective queries. For example, if "ABC-FW-AbcFW-Work” is your application work class and the work type is TypeA, then PXOBJCLASS for the work objects created under work type TypeA are “ABC-FW-AbcFW-Work-TypeA." The following sample queries are for each shared table.
PR_ASSIGN
SELECT * FROM <SCHEMA_NAME>.PR_ASSIGN WHERE PXREFOBJECTCLASS LIKE 'ABC-FW-AbcFW-Work%';
PC_INDEX_WORKPARTYSELECT * FROM <SCHEMA_NAME>.PC_INDEX_WORKPARTY WHERE PXINSINDEXEDKEY LIKE 'ABC-FW-ABCFW-WORK%';
PC_ASSIGN_WORKBASKETSELECT * FROM <SCHEMA_NAME>.PC_ASSIGN_WORKBASKET WHERE PXREFOBJECTCLASS LIKE 'ABC-FW-AbcFW-Work%';
PC_ASSIGN_WORKLISTSELECT * FROM <SCHEMA_NAME>.PC_ASSIGN_WORKLIST WHERE PXREFOBJECTCLASS LIKE 'ABC-FW-AbcFW-Work%';
PC_LINK_ATTACHMENTSELECT * FROM <SCHEMA_NAME>.PC_LINK_ATTACHMENT WHERE PXLINKEDCLASSFROM LIKE 'ABC-FW-AbcFW-Work%';
PC_DATA_WORKATTACHSELECT * FROM <SCHEMA_NAME>.PC_DATA_WORKATTACH WHERE PZINSKEY LIKE '%ABC-FW-ABCFW-WORK%';
PC_HISTORY_WORK (If Shared across applications)SELECT * FROM <SCHEMA_NAME>.PC_HISTORY_WORK WHERE PXHISTORYFORREFERENCE LIKE 'ABC-FW-ABCFW-WORK%';
PC_DATA_UNIQUEIDSELECT * FROM <SCHEMA_NAME>.PC_DATA_UNIQUEID WHERE PYPREFIX LIKE '<WO_PREFIX>%';WO_PREFIXis the work object prefix ID used by the work item in the application. If there are many work types with different prefixes, use the OR command in the query.
PC_LINK_FOLDERSELECT * FROM <SCHEMA_NAME>.PC_LINK_FOLDER WHERE PZINSKEY LIKE '%ABC-FW-ABCFW-WORK %';
PR_SYS_QUEUE_SLA (to retrieve SLA queue instances related to worklist assignments)SELECT <SLA_TABLE_OBJECT>.* FROM <SCHEMA_NAME>.PR_SYS_QUEUE_SLA <SLA_TABLE_OBJECT>, <SCHEMA_NAME>.PC_ASSIGN_WORKLIST <WL_TABLE_OBJECT> WHERE <SLA_TABLE_OBJECT>.PXINSNAME = <WL_TABLE_OBJECT>.PXREFQUEUEKEY AND <WL_TABLE_OBJECT>.PXREFOBJECTCLASS LIKE 'ABC-FW-AbcFW-Work%';
PR_SYS_QUEUE_SLA (to retrieve SLA queue instances related to workbasket assignments)SELECT <SLA_TABLE_OBJECT>.* FROM <SCHEMA_NAME>.PR_SYS_QUEUE_SLA <SLA_TABLE_OBJECT>, <SCHEMA_NAME>.PC_ASSIGN_WORKBASKET <WB_TABLE_OBJECT> WHERE <SLA_TABLE_OBJECT>.PXINSNAME = <WB_TABLE_OBJECT>.PXREFQUEUEKEY AND <WB_TABLE_OBJECT>.PXREFOBJECTCLASS LIKE 'ABC-FW-AbcFW-Work%';Get the application-specific queue data such as work items or assignments to be processed in the background by an agent.
Get the distinct values of pyAgentName from the PR_SYS_QUEUES table.
Identify the application-related agent names from the above list.
Run the following query with all the application-specific agent names to fetch the queue data:
PR_SYS_QUEUESSELECT * FROM <SCHEMA_NAME>.PR_SYS_QUEUES WHERE PYAGENTNAME IN ( '<agent_name1>','<agent_name2>');
Importing the data into the target system
- Stop all the agents in the PRPC 5.x/6.x instance.
- Stop all the agents in the Pega Platform instance.
- Shut down the PRPC 5.x/6.x instance by using the application server utilities or command line.
- Shut down the Pega Platform instance by using the application server utilities or command line.
Export data from these tables to the target database schema. This task can be completed by using database utilities or scripts provided by vendors. For example, the Oracle Data Pump utility can be used to export and import data if the database used is Oracle. The following sample query structure shows the structure used by Oracle Data Pump utility.
Export data
Sample EXPDP Query 1
expdp <SOURCE_USER>/<SOURCE_PASSWORD> directory=<DIRECTORY_NAME> dumpfile=<DUMP_FILE_NAME>.dmp TABLES= <SCHEMA_NAME>.<TABLE_NAME> query=<SCHEMA_NAME>.<TABLE_NAME>:\"where <COLUMN_NAME> LIKE \'<SEARCH_STRING>\'\"
Equivalent SQL Select QuerySELECT * FROM <SCHEMA_NAME>.<TABLE_NAME> WHERE <COLUMN_NAME> LIKE '<SEARCH_STRING>%';
Sample EXPDP Query 2expdp <SOURCE_USER>/<SOURCE_PASSWORD> directory=<DIRECTORY_NAME> dumpfile=<DUMP_FILE_NAME>.dmp TABLES= <SCHEMA_NAME>.<TABLE_NAME>
Equivalent SQL Select QuerySELECT * FROM <SCHEMA_NAME>.<TABLE_NAME>Import data
Sample IMPDP Query
impdp <TARGET_USER>/<TARGET_PASSWORD>@<DB_NAME> directory=<DIRECTORY_NAME> dumpfile=<DUMP_FILE_NAME>.dmp REMAP_SCHEMA= <SOURCE_SCHEMA>:<TARGET_SCHEMA> REMAP_TABLESPACE= <SOURCE_TABLESPACE>:<TARGET_TABLESPACE> TRANSFORM=oid:n TABLE_EXISTS_ACTION=APPEND
If both the source and target schema are in the same database, you can use the insert queries to migrate data. However, insert queries might not be efficient in real-time production scenarios.If the column in both the source and target schema is the same, use “Sample Insert Query 1.” If the column in both the source and target schema differs, use “Sample Insert Query 2” and specify the exact column names when inserting data.
Sample Insert Query 1insert into <TARGET_SCHEMA>.<TABLE_NAME> (select * from <SOURCE_SCHEMA>.<TABLE_NAME> where <SOURCE_COLUMN_NAME> ='<SEARCH_STRING>');
Sample Insert Query 2insert into < TARGET _SCHEMA>.<TABLE_NAME> (<COLUMN_NAME1>, <COLUMN_NAME2>,…, <COLUMN_NAMEn>) select <COLUMN_NAME1>, <COLUMN_NAME2>,…, <COLUMN_NAMEn> from <SOURCE_SCHEMA>.<TABLE_NAME> where <SOURCE_COLUMN_NAME> ='<SEARCH_STRING>');Migrate the standard database tables to the target database. The following shared tables must be migrated as part of this process:
PR_ASSIGN
PC_INDEX_WORKPARTY
PC_ASSIGN_WORKBASKET
PC_ASSIGN_WORKLIST
PC_LINK_ATTACHMENT
PC_DATA_WORKATTACH
PC_HISTORY_WORK
PC_DATA_UNIQUEID
PC_LINK_FOLDER
PR_SYS_QUEUE_SLA
PR_SYS_QUEUES
Identify and migrate work and history tables that contain application-specific data.
Migrate declare index tables that are application-specific. The Package Work wizard does not identify the declare index tables, so identification and migration of all such tables should be considered separately.
Migrate custom tables that are specific to your application. If your application has custom queue tables, they must be explicitly migrated.
Start the Pega Platform instance by using the application server utilities or command line.
Postmigration tasks
To update the existing applications, make an entry in PR_SYS_QUEUE_SLA for the work objects.
- Click Designer Studio > System > Release > Upgrade > Update Existing Applications.
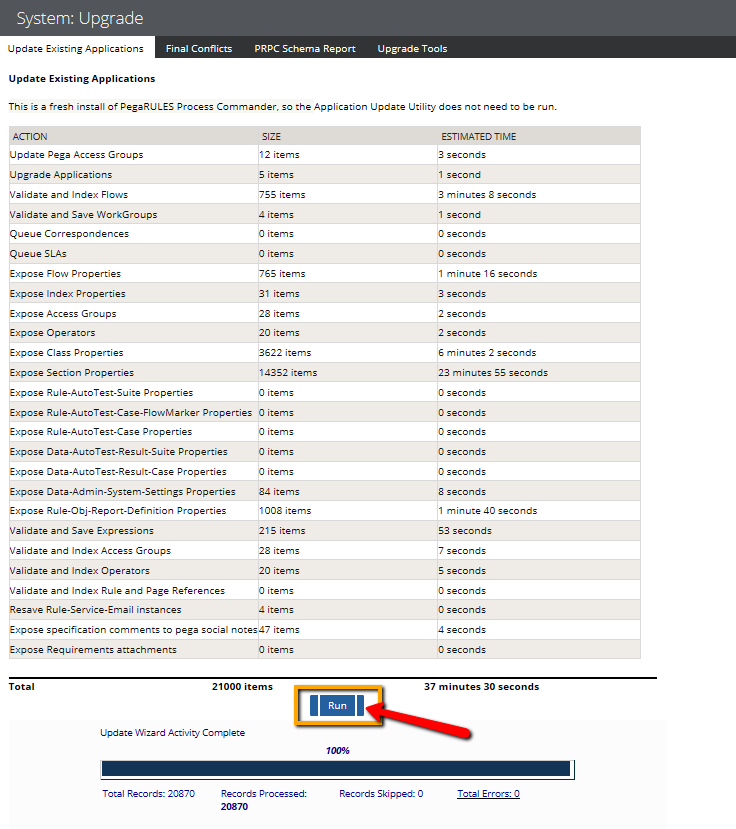
- Click Run.
Revalidate and save rulesets for Rule-Obj-ServiceLevel Class
Perform this step if you are migrating data from 5.x versions.
Click Designer Studio > System > Release > Upgrade > Validate > Revalidate and Save.
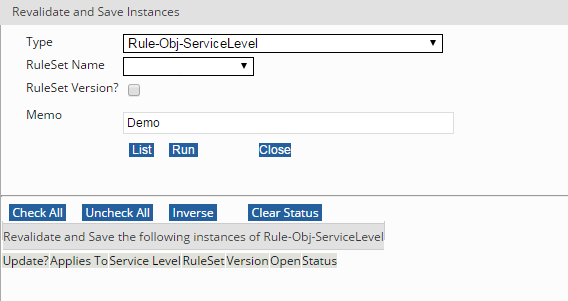
Select the type as Rule-Obj-ServiceLevel.
Select the RuleSet Name.
Click List. The rules created under the selected ruleset are listed.
Click Check All.
Click Run.
Repeat Steps 2 through 6 for all the rulesets in the application that have the Service Level rule.
Start the Pega Platform agents
Start all the application-related and Pega Platform agents by using the System Management Application (SMA) portal.