Tutorial: Using branches for parallel development
When a two or more teams in a development organization work on rules in the same application rulesets, any changes made by one team might result in conflicts with changes made by another team. These rule conflicts can become disruptive to the overall project because resources must be spent to identify and resolve conflicts.
By using branches, rule development can take place within an isolated space (the branch) without affecting functionality in the source rules.
Example usage
The following example describes a situation when it is recommended that you use branches during rule development.
Team Alpha wants to work on feature ABC at the same time that Team Beta wants to work on feature XYZ, and both features involve rules in the same rulesets. The teams' day-to-day development activity is largely independent. Whichever team completes its work first wants to incorporate its rules into the application first.
With the features of branches and branch rulesets, each team creates its own branch in which to perform the work to implement its feature. When work is done, the team resolves any conflicts that the system detects between its branch's rules and other instances of the rules, and then down merges the branch's rules into the base application.
Suggested approach
Use this tutorial to configure a development environment that uses branches for parallel development. The tutorial consists of the following steps:
- Create a team application that is built on the main application
- Provide access to the team application
- Create branches in the team application
- Create the branch rulesets for the branches
Step 1: Create a team application that is built on the main application
Team applications are typically named in a way that reflects the base application, team name, or focus of the team. For example, for a base application named NewHireOnboardApp for which the Team Alpha development team is developing a feature for the layout of their user portal, the name of the team application could be OnboardPortal.
- Create an application in the New Application Wizard.
- Enter a name in the Application name field.
- From the Built on application list, select the base application (for example, NewHireOnApp) on which to build this application.
- Enter or select a value in the Organization field.
- Specify other application settings, as appropriate. For more information, see New Application Wizard.
- Open the application rule form, click the Definition tab, and select the Include Parent check box.
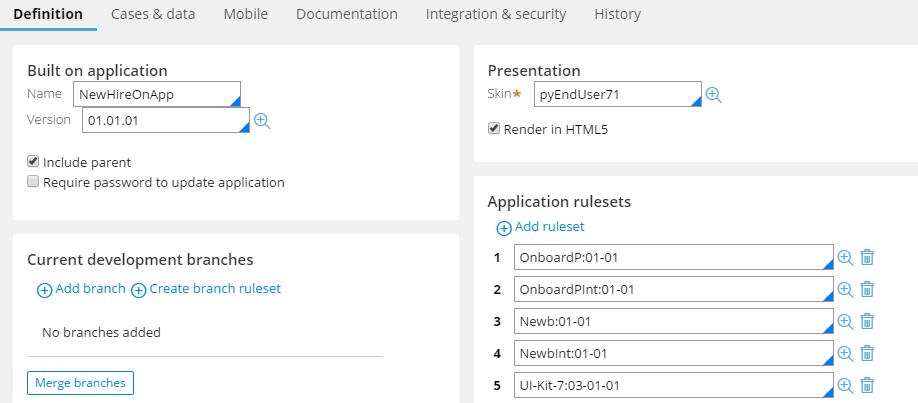
Definition tab on the application rule form
- Click .
Step 2: Provide access to the team application
To give team members access to the team application:
- Create an access group that references the team application. The typical name access group name uses the application name plus the standard user type, such as OnboardPortal:Administrators. For detailed information about creating access roles, see About Access Group data instances.
Ensure that the access group:- Uses access roles that are sufficient for developing and testing your application. (These roles could be the same ones that are specified in the access group for the base application.)
- Has the default portal set to the portal that you want team members to use when developing in the branches (typically the Developer portal rule).
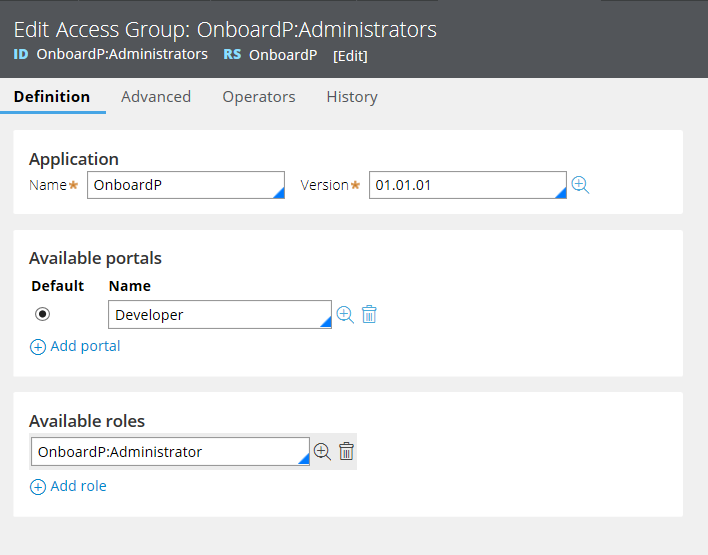
Access group for the team application
- Update the team member operator IDs to include the access group. For detailed information about operator IDs, see About Operator ID instances.
Operator ID mapped to access group
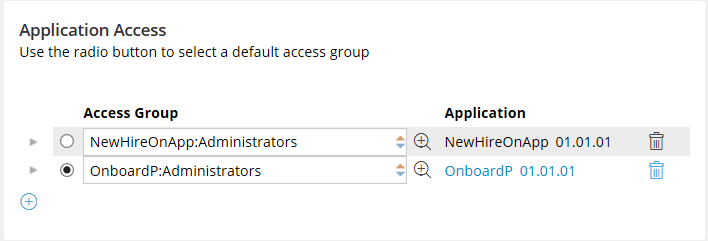
- Switch to the team application by doing one of the following actions:
- If you added the access group to your operator ID, click .
- If you did not add the access group to your own operator ID, log out of the system, and then log in to the team application by using one of the operator IDs that includes the access group.
Step 3: Create branches in the team application
To create a branch:
- On the Definition tab of the application rule, click .Add branch on the Definition tab of the application rule form
- In the Add a Branch ID dialog box, enter a name for the new branch, and click .
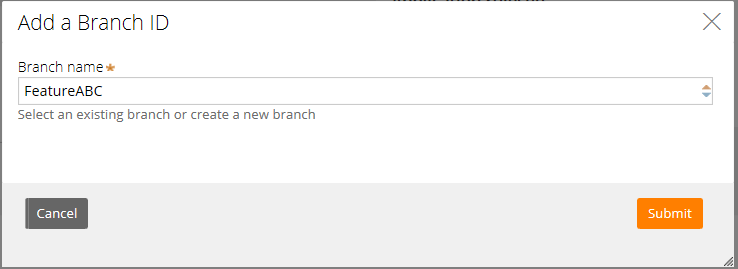 Add a Branch ID dialog box
A branch name must start with a letter and contain only alphanumeric characters and hyphens, up to a maximum of 16 characters. A best practice for the name is to relate it to the planned development work taking place in that branch. For example, when you use a project management tool to organize planned enhancements by identifier, you can base the branch name on that identifier, such as FeatureABC.
- If you are using multiple branches in the application rule, ensure that the order of the branches as listed in the Current development branches list matches the order in which the rules should be resolved for this development application's users (the developers on the team). When a developer logs in to this development application, the system assembles the developer's ruleset list, and the branch rulesets according to the sequence in which the branches are listed in the Current development branches list.
- In the Current development branches list, drag the branches to put them in the order that you want.
Step 4: Create the branch rulesets for the branches
The development application must have at least one branch before you create a branch ruleset. A branch ruleset is "branched from" a ruleset in the main (base) application or any of its built-on applications. The team determines which rulesets contain the rules it expects to modify for a planned enhancement and creates the branch ruleset based off of those rulesets.
- Open the application rule form, click the Definition tab, and click Create branch ruleset.
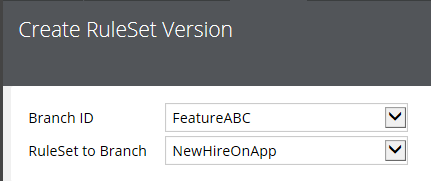
- In the Create Ruleset Version dialog box, from the Branch ID menu, select the branch ID to contain the branched rules.
Create branch rulesets for a branch ID
- From the RuleSet to Branch menu, select the ruleset from which to branch the rules for the branch ID.
- Click . The system opens the ruleset form for the branch ruleset.
- In the ruleset form, click to save the branch ruleset to the system. The name of the branch ruleset is set to a combination of the name of the base ruleset from which it is branched and the name of the branch.
- Repeat step 1 through step 3 to create the branch rulesets for all the main rulesets that contain rules that the team expects to modify in that branch.
- Confirm that the branch rulesets are associated with the development branch by opening the rule form for the team application.
- In the Current development branches list, expand the branch that you selected for the branch rulesets. All the branch rulesets associated with that branch are displayed:
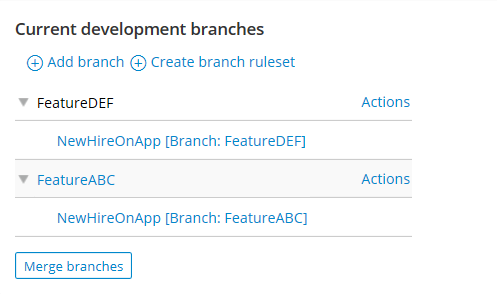 Current development branches list
Next steps
You can merge one or more branches by using the Merge Branches wizard. See Using branch rulesets and merging branches for parallel development.
If the wizard detects issues with the merge, it displays them before the merge starts. You must resolve conflicts before you merge; warnings are informational and do not need to be resolved. For detailed information, refer to Conflicts and warnings in the Merge Branches wizard.
For more information about how to merge branches, see Tutorial: Merging branches.
Previous topic Tutorial: Merging branches Next topic Direct Capture of Objectives (DCO)